
More than 60 percent of home cooks in cities across Asia find themselves struggling to keep kitchen counters tidy and tools easy to reach, especially in small apartments inspired by American efficiency. Cluttered drawers and crowded shelves slow down meal prep, often turning everyday cooking into a stressful challenge. This step-by-step guide shows urban cooks how to assess, sort, and arrange utensils so their compact kitchens feel organized, spacious, and ready for every meal.
Table of Contents
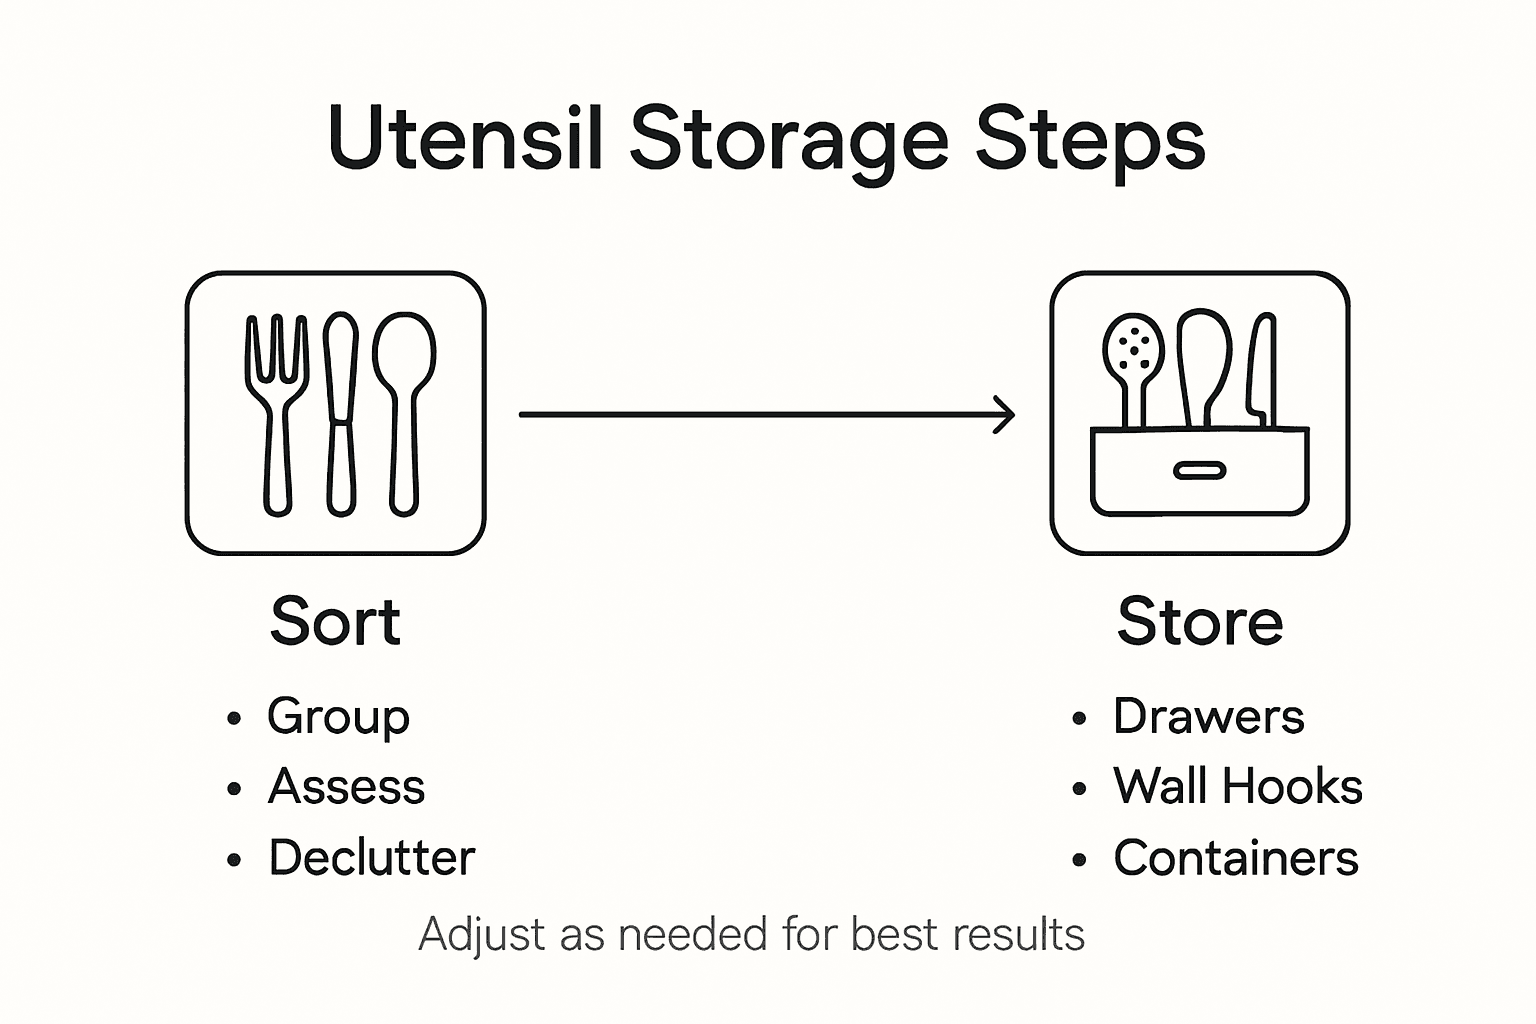
- Step 1: Assess and Sort All Kitchen Utensils
- Step 2: Select Appropriate Storage Solutions
- Step 3: Organize Utensils by Usage and Frequency
- Step 4: Install and Arrange Storage Containers
- Step 5: Test and Adjust Layout for Daily Use
Quick Summary
| Main Insight | Description |
|---|---|
| 1. Sort Kitchen Utensils | Remove all utensils and group them by type for easy assessment. This helps identify duplicates and unusable items. |
| 2. Choose Storage Wisely | Select storage solutions that maximize space while ensuring accessibility for essential tools. Consider drawer organizers and wall-mounted options. |
| 3. Organize by Usage | Arrange utensils based on frequency of use, placing daily items within easy reach for improved cooking efficiency. |
| 4. Install with Care | Use appropriate containers and ensure visibility for easy access to utensils. Clearly label items to maintain organization. |
| 5. Test and Adjust | Experiment with the setup during cooking to identify any issues, making necessary adjustments to enhance workflow and comfort. |
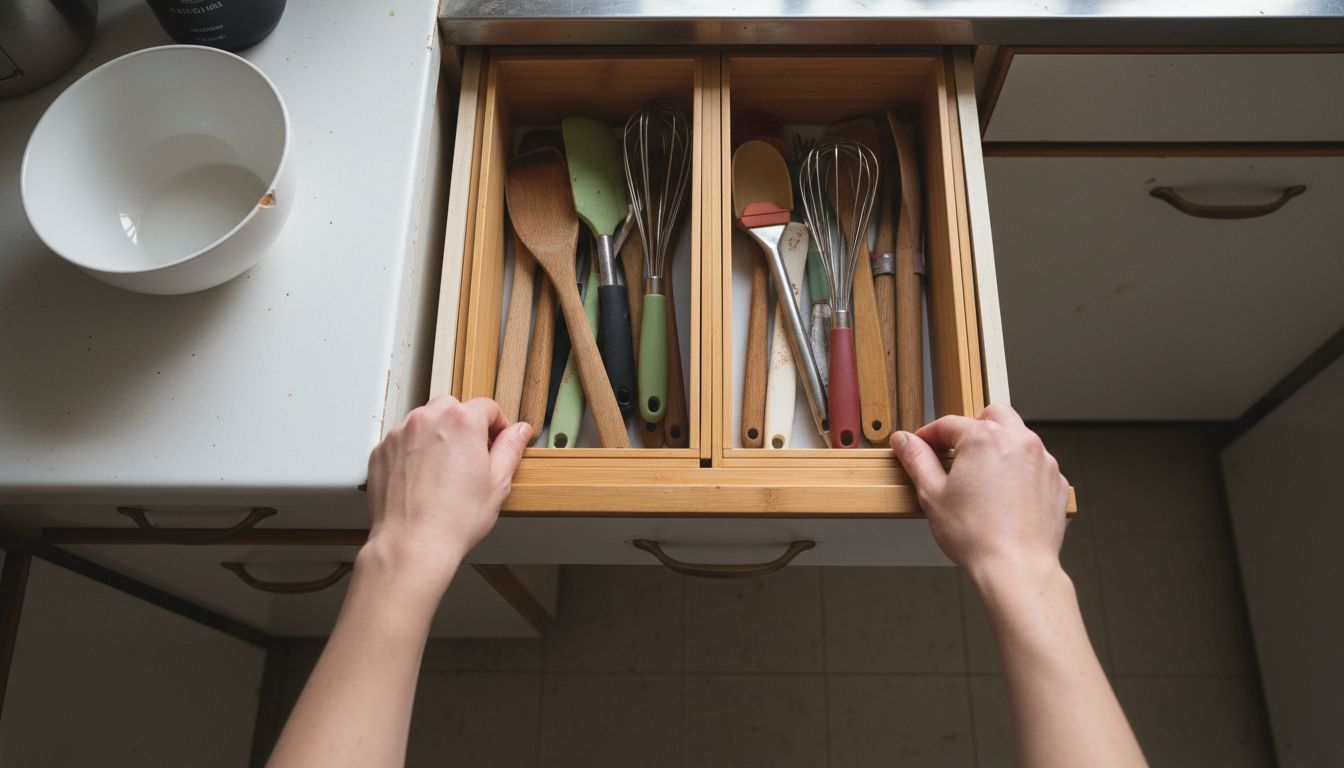
Step 1: Assess and Sort All Kitchen Utensils
Taking a systematic approach to kitchen utensil organization starts with a comprehensive assessment and strategic sorting process. Professional organizers recommend beginning by removing every utensil from its current storage space to get a clear visual inventory of everything you own.
Start by spreading all your kitchen utensils on a clean countertop or large table. Group similar items together: spatulas with spatulas, whisks with whisks, measuring cups with measuring cups. This visual sorting helps you quickly identify duplicates, damaged items, or tools you rarely use. Assess each item based on three key criteria: frequency of use, condition, and actual utility in your cooking routine. Keep only the utensils that serve a genuine purpose and are in good working condition.
Once you have sorted your collection, you will have a streamlined set of essential kitchen tools ready for strategic storage solutions. This initial assessment creates a solid foundation for developing an efficient and organized kitchen space.
Pro tip: Consider creating three piles during sorting: keep, donate, and discard to make your assessment process more methodical and decisive.
Step 2: Select Appropriate Storage Solutions
Choosing the right storage solutions transforms your kitchen from cluttered to organized. The key is matching your utensil collection with kitchen storage options that maximize vertical and horizontal space while keeping tools accessible and protected.
Consider your kitchen layout and available space when selecting storage solutions. Drawer organizers work well for smaller utensils, allowing you to separate and compartmentalize tools efficiently. For countertop spaces, vertical storage like utensil crocks or wall mounted rails can free up valuable counter real estate. Magnetic strips provide an innovative option for metal utensils, creating a sleek display that keeps cooking tools within easy reach. Look for storage solutions that are sturdy, easy to clean, and match your kitchen aesthetic.
Prioritize functionality and accessibility when making your selections. Your storage system should not only look good but also make cooking and meal preparation smoother and more enjoyable.
Pro tip: Measure your drawer and cabinet spaces before purchasing storage solutions to ensure a perfect fit and maximize organizational efficiency.
Here’s a quick comparison of common kitchen utensil storage solutions and their best uses:
| Storage Solution | Ideal For | Key Benefit |
|---|---|---|
| Drawer Organizers | Small utensils | Maximizes drawer efficiency |
| Utensil Crocks | Frequently used tools | Keeps items within easy reach |
| Wall Mounted Rails | Large or hanging utensils | Frees counter space |
| Magnetic Strips | Metal utensils | Modern look, easy access |
| Adjustable Racks | Mixed or large tools | Customizable organization |
Step 3: Organize Utensils by Usage and Frequency
Effective kitchen organization goes beyond simple storage. The goal is creating a system that makes your cooking routine smoother and more intuitive. Kitchen essentials require strategic placement based on how often you use them, ensuring your most frequently used tools are always within easy reach.
Start by dividing your utensils into three primary categories: daily use, occasional use, and rare use. Daily use utensils like spatulas, wooden spoons, and whisks should be stored in the most accessible locations. This might mean a countertop crock, top drawer, or hanging rail near your primary cooking area. Occasional use items such as specialty baking tools or seasonal equipment can be stored in secondary spaces like middle or bottom drawers. Rare use utensils those you might only use once or twice a year can be stored in harder to reach cabinet spaces or even packed away in storage containers.
Think about your typical cooking workflow when determining placement. The most efficient kitchen organization mimics your natural cooking movements, reducing unnecessary reaching and searching.
Pro tip: Color code or use drawer dividers to further refine your utensil organization system and maintain long term tidiness.
Step 4: Install and Arrange Storage Containers
Transforming your kitchen storage requires thoughtful selection and strategic installation of storage solutions that maximize your kitchen’s organizational potential. The right containers can turn cluttered spaces into efficient, accessible cooking zones.
Begin by selecting containers that match your specific utensil types and storage areas. Drawer dividers work exceptionally well for creating compartments that keep utensils separated and easily identifiable. For vertical storage, consider adjustable racks or expandable organizers that can adapt to your changing kitchen needs. Install wall mounted systems using sturdy brackets, ensuring they can bear the weight of your utensils. When arranging containers, prioritize visibility and accessibility. Place frequently used items at eye level or in front of storage spaces, while less common tools can be positioned in deeper or higher sections.
Remember that installation is about creating a system that feels intuitive and makes your cooking routine smoother. Your storage should feel like an extension of your culinary workflow.
Pro tip: Use clear labeled containers to create a visual inventory that helps you quickly locate and return utensils to their designated spaces.
Step 5: Test and Adjust Layout for Daily Use
Professional kitchen organization guides recommend thoroughly testing your storage arrangement through actual cooking scenarios to ensure your new system genuinely improves your workflow. The real test of any organizational strategy happens during real cooking sessions.
Spend several days actively using your new kitchen layout and pay close attention to how smoothly you can access utensils and move between storage areas. Notice any moments of friction where you find yourself reaching awkwardly or struggling to retrieve tools. These small inconveniences signal areas that need refinement. Consider the ergonomics of your setup tracking how many steps you take and how comfortable you feel while preparing meals. Some adjustments might involve shifting containers by just a few inches or swapping the locations of frequently and rarely used utensils to create a more intuitive flow.
Remember that kitchen organization is an evolving process. Your initial setup is just the beginning, and small tweaks can dramatically improve your cooking experience.
Pro tip: Keep a small notepad near your kitchen workspace to quickly jot down storage placement ideas as you notice them during cooking.
This summary highlights the main steps to achieve a more organized kitchen:
| Organization Step | Core Action | Main Goal |
|---|---|---|
| Assess & Sort | Review and group all utensils | Reduce clutter |
| Select Storage Solutions | Match tools to storage types | Maximize space use |
| Organize by Usage | Place by frequency of use | Improve accessibility |
| Arrange Storage Containers | Install and label containers | Streamline workflow |
| Test & Adjust | Cook and tweak setup as needed | Ensure comfort and flow |
Maximize Your Small Kitchen Space with Smart Utensil Storage Solutions
Struggling to organize kitchen utensils in a small space can feel overwhelming. This guide helps you tackle clutter by focusing on assessment, strategic sorting, and smart storage choices like drawer organizers and vertical racks. If your goal is to create a kitchen that feels spacious and efficient without sacrificing style or accessibility then you need the right tools to make it happen.

Discover a variety of compact and functional options in our Kitchen Essentials – Myzabka collection designed specifically for small kitchens. From clever utensil crocks to adjustable storage racks you can transform every inch into a practical cooking zone. Don’t wait to experience the joy of a kitchen where everything is within reach and clutter stays out of sight. Visit Myzabka now and bring order to your kitchen today. For more great tools to simplify your home life check out our Home Tools – Myzabka and see what our Best Sellers – Myzabka can do for your space.
Frequently Asked Questions
How do I assess my kitchen utensils for better storage?
To assess your kitchen utensils, remove all items from their storage spots and group them by type. Evaluate each utensil’s frequency of use, condition, and utility, keeping only the essentials that are in good shape.
What types of storage solutions work best for small kitchen spaces?
In small kitchens, opt for compact storage solutions like drawer organizers for small utensils or wall-mounted racks for larger tools. Use vertical storage options to maximize space and keep items accessible.
How should I organize kitchen utensils based on how often I use them?
Organize your kitchen utensils into three categories: daily use, occasional use, and rare use. Place daily items in easily reachable spots, while store occasional items in less accessible locations to maintain a clean workspace.
What steps should I follow to install and arrange storage containers in my kitchen?
Begin by selecting appropriate storage containers for your utensils and install them in a way that prioritizes visibility and accessibility. Position frequently used items at eye level to streamline your cooking process and reduce search time.
How can I test my kitchen storage layout for effectiveness?
To test your kitchen storage layout, actively use your space over a few days while cooking. Pay attention to any awkward movements and adjust the placement of utensils as needed to enhance comfort and efficiency during meal prep.